Monday, June 22, 2009

Natural Jewelry Holder

Ok so i was cleaning up my room and realized my jewelry was so messy and i needed to clean it up. So i took a walk down to the canyon and grabbed a branch that i had found on the ground

What is needed:
- a branch with alot of twigs
- a small jar
- pebbels
- Spray paint
-hot glue
1st- Get your branch and strip it of any leaves. NOTE: make sure branch is strong enough to hold jewelry!

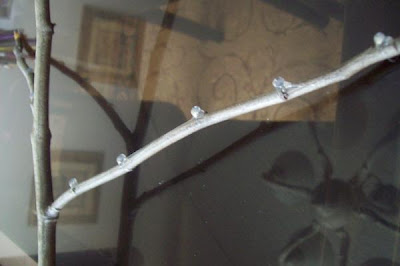
1.5- Put dots of hot glue onto the branch, this will help the jewelry be separated.

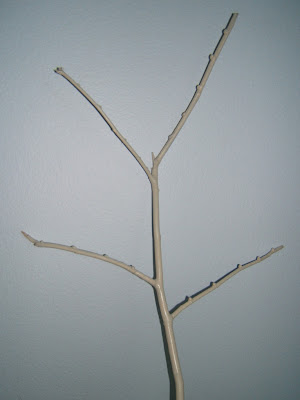
2nd- Spray paint the branch to a color you desire. Im using a creme color.

3rd- Find a whole bunch of pebbels and clean them off, then spray paint them(if you want) it could also look cool if you left them as is, i could not find any pebbles, so i used sand. and it worked. I dont have a picture for this because I didnt spraypaint the sand.
4th- Glue the bottom of the branch to the bottom inside the jar.

5th- Fill up with the pebbels or sand or whatever you want to fill it up with.
6th- Make sure its stable.

WERE DONE!
I think this woul be an awesome birthday present. Or any kind of present for that matter.

Saturday, June 20, 2009

Caprisun Wallet

Here i'm going to show you how to make a wallet using recycled caprisuns. Its really easy and quick and efficient.

Your going to need:
-4 empty capri suns 0$
-an inch of velcro 1$ for a about a yard
-sewing maching (you could probably do it by hand but im sure that would be hard)
Preparation: Clean out the caprisun so that you dont get sick from bateria or mold.

1st-Set your machine on zigzag stich and sew 2 caprisuns together so its a little larger than a dollar bill. I make mine so that its 2.5 inches over lapping the other. Make 2.

2nd- Take the two pieces you have made and turn them over, you will see that there is excess caprisuns like this:
just sew that down to make it look like this:

3rd- Velcro. I like to use a straight stich on this. Set a peice of velcro so that its centered and 1 inch from the top. Sew.

On the 2nd peice, make sure to do the same, but on the OPPOSITE side. So you should have 2 peices that look like this:

4th-Set your machine so its zigzag stitch again. Put the 2 sides together (with velcro on opposite sides) and sew together leaving a place to put your cash and cards. NOTE: make sure you double back to reinforce the stiching.

AND WERE DONE!


If your too lazy to make this... you can go get it at catnip008.etsy.com

Sunday, June 14, 2009

Feather Hairpiece

So this week, I decided to post the tutorial for the feather hairpiece which i saw at Urban Outfitters for 18$

Anyway your going to need:
-Embroydery Floss - 25 cents
-Spring Loaded Hairclip- about 4 dollars for 10
-Beads- 1.99 for a pack
-Feathers-1.99 for a pack
-Ribbon- 1$
-Hot Glue gun/ glue to put it all together.
Preparation: Cut the Floss until you have the 4 different lengths you want. (my longest peice was the length of my hair)
1st- Get the clip and clip it onto a peice of paper. Then glue the ends of the 4 strings onto the tip.


2nd- Glue the strings onto the rest of the clip.


3rd-(optional) Sketch out the hair piece so you dont have it too bunched in one area.


4th-To attach beads and feathers to string, Slide on bead and make a knot where you want it to be located. NOTE: Dont not do the ends yet!


5th- With the bead a little higher than the knot, stick the feather into the bead and put hot glue or super glue on the knot, then quickly slide the bead onto the knot. NOTE: do not get glue on feathers, it will make them look clumpy.


6th- For the ends of the string, slide on a bead and make a knot leaving about an inch left on the string. Repeat step 5.


7th- Finishing off the clip, we are going to glue the end of the ribbon (with out touching the spring) to the inside of the clip. NOTE: Do NOT glue the top and bottom of clip together.


8th- Wrap all the way around too the tip and back, (keep it tight,) and glue the end to keep in place.


9th- Cut off ends of feathers that are hanging off, and take off excess glue. I also reglued everything so it really stays in place. Also, cut of the excess string at the ends.


AND WE ARE DONE!
...and this is what it will look like.
If you are too lazy too make your own, Just go to catnip008.etsy.com to get one.

Tuesday, June 9, 2009

Hi!

Hey, my names megan. I like crafts. I like volleyball, the beach, and exploring nature. Idk why i am telling you this, just so you know. Any way, Im sick of going to stores and seeing things that can be simply made, selling for about 30$. So i decided that every week i will try post a blog on how to make a craft thats... Urban.
So im thinking for starters im going to try and make this:

it looks easy enough. So im off to Joanns to get some supplies and i will post something soon when i finish it.