Monday, October 19, 2009

Inspiration

OK, i know i havent posted in a while. Ive been so busy with school and volleyball and college apps im kinda frekaing out, but ive had a litttle down time and i want to keep making these blogs.

SOO for this new season of arts and crafts, im going to start off with just a list of things you can make or get inspired by. ill make a legit tutorial soon. I promise!

Eco friendly Projects:

#1: Magazine bowl,

#2:Morsbags aka reusable shopping bag
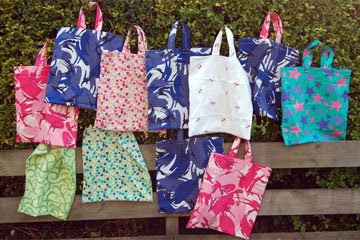
- this website is really inspiring and i think everyone should do this and give at least 5 away. Personally, im taking the websites advice and starting a "pod" me and my group of friends, who don tknow how to sew...yet, will make a bunch of these and will give them out to neighbors and teachers.
- Another reason to do this, go and google "Eastern Garbage Patch" its a island in the Pacific ocean that is a giant soupy mass of trash the size of the united states and a half. Its a hundred feet deep and there is a mountian of trash that has sunken to the bottom.

#3: Plastic Yarn
if you are going to knit or crochet a bag out of plastic bags, this is where you should start.
I think i will try...attempt... to make a bag later in the year when i have time, maybe December.

So there are some projects to get u inspired, if you make any please put a picture on the comments. or send me the link to a picture. Any way. to you seniors out there just like me, GOOD LUCK on your applications to college, i hope you get into the school you want to go to!

Monday, August 3, 2009

Leather neaklace

I got inspiration for this from a necklace i had bought and i decided that i should try to make it.
What you will need:
-12 of Leather strip
-3 feathers
-Beads
-hot glue gun
1st- take your 12 feet of strip and cut it into 3 4ft long peices. Then Braid them together and leave about 4 to 5 inches unbraided on each side.
2nd-take a really big bead, or one that will fit all 6 peices and use it to make the loop. DONT glue it yet.
it should look like this :
3rd-Now take one of the end peices and put on a decorative bead, and make a knot at the end so it wont fall off.
4th-Do this with all the end peices.
5th- now take the big bead and push it up. Now take the hot glue and glue feathers on then push the bead back down to where it began.
Now let it dry AND YOUR DONE!
please excuse the sunburn. haha.

Sunday, July 26, 2009

Beaded Box

So as i was searching through my studio (garage) today, i came across this box of beads i used when i was a little kid. I sat for a while thinking what i could possibly do with these to get rid of them and came up with this idea.
What you will need:
-about 78 popsicle sticks
-glue
-8 big beads
-a bunch a other beads
-creativity
TIPS:
-Dont use hot glue to put on the beads like i did! it gets litte glue strings everywhere that are soo annoying!
-start from the middle of the design out

1st- line up 11 popsicle sticks and glue 2 popsicle sticks perpendicular at the top and bottom. MAKE 6.

2nd-Take 2 of the squares and glue the big beads in each corner.

3rd- Take a beaded square and a non beaded square and glue 2 of the sides together at the beads.

4th- Do this again so you have 2 peices
.

5th- Glue the 2 peices together to form a cube. make sure the beaded squares are on opposite sides

6th- Now take the 5th square and glue it onto one of the open sides. (glue onto the beads)

7th- Now its time to start bringing out the smaller beads. Sketch out the design you want onto the box and start glueing the beads.


8th- Cover the whole box with beads.


9th- Take the 6th and lone square and put a giant bead (or anything else youwant) onto the center of the box, this is the handle and the square is the top of the box.


10th- Glue on beads to that.


Were done!


Fill up your box with whatever you want and enjoy.

Tutorials

I have been kind of lacking on posts for a while so here is a quick post about some tutorials that i liked or want to try. I will make a new tutorial soon!

Anyway here we go:
The "tutowlrial." These make perfect gift and room decorations.

How to tye dye using bleach

Oragami fish mobile

and the last for now...
Duct tape roses. I think i am going to make a bunch of these for my room.

So ill get working on a new post asap, expect it around the 29th.

Wednesday, July 15, 2009

Resin Resin Resin

Resin. Its really not as complicated as you think, well if you know what to do and what not to do. Anyway, today, im going to show you how to make a necklace using a snapple cap and yes, resin.
What your going to need:
-resin about 16$ (it makes alot of these)
-the catalyst about 5$
-snapple caps 0$
-6mm split rings about 3$
-Ball chain Necklace 18" about 1.30$
(or you could use a chain from a necklace you dont like. RECYCLE)
Before you Begin Read these tips:
-if your going to use paper to decorate, laminate it.
- its easier to glue everything down before you use resin (hot glue)
- Do not leave it out to dry in the hot/ in the sun or it will look glazed over
- make sure you use the instructed amount of catalyst or it will be sticky
-If your using sparkle glue or something like that, make sure its dry before you use the resin.
-Wear gloves!

1st- Prepare the snapple cap. Get a hammer and a nail and make 2 holes. Open up the slit ring and slide it through. And yes i know this isnt a snapple cap, BUT its the same thing except its red and says sweet tea on it.

2nd- Time to decorate. I am making gifts for my friends so im going to have inside jokes. Make sure you read the tips. Im going to laminate some paper i got from a magazine and im also going to use sparkles.

3rd- Once your done decorating, read the directions on the resin container and figure out the resin to catalyst ratio. The snapple cap is 1/4 in deep so my instructions say to use 8 drops of catalyst.

4th-Mix the instructed amount for 1 minute, dont be alarmed if there are bubbles.

5th-Pour it slowly into the cap and make sure if there are any big bubbles that you pop them before it hardens. Fill the cap up without over flowing it. If you did, dont worry i will talk about that later.

6th-Let dry for 24 hours, in an indoor, room temperature place. I wouldnt touch it for at least 2 days.

7th- Put the cap onto the chain and your finished!


IF yours over flowed:
(if wet) wipe off and set down in a dry place
(if dry) try to pry off, maybe sand it down and clean off.

If your too lazy to make this or just like what you see, go to catnip008.etsy.com and buy it.

Sunday, July 12, 2009

Negative Lace Shirt

Heyyy so yeah its been a while, for this weeks first tutorial (one of many to come) I am going to show you how to make this negative lace shirt. I have been making these for a while, but i have been keeping the tecnique a secret, until not now at least.
What your going to need:
-Spray paint 3 shades of a color. about 3 to 12 dollars depending on what brands you use(Im using light blue, regular blue, and navy.)
-3/4 yards of a lace fabric
-spray adhesive
-a shirt
1st- Spray the adhesive onto one side of the lace then place that sticky side onto the front of the shirt.

2nd- Make sure there are no wrinkles on the shirt. Now get the lightest color and spray the top third.

3rd- Spray the middle with the 2nd darkest color.

4th- Now im sure you have guessed that you spray the bottom 1/3rd with the darkest color.

5th- Take off the lace and let all the paint dry on both the shirt and the lace.

6th- Repeat steps 1 through 5 with the back.

WERE DONE WOO!
When i finished this... i was so excited about how sick it looked! I cant wait to wear it out!!

If you like what you see, but too lazy to make it, go to catnip008.etsy.com

Wednesday, July 8, 2009

Comming up...

Sorry there havent been many posts these past 2 weeks, but dont worry, i havent forgotten about this project, im just on vacation and its kind of hard to do this when i am away from my studio (garage) hah. ANY WAY i just wanted to post some pictures of what im thinking about posting tutorials of.
Ok so first is this, maybe with only 1 flower though, i think 5 is way too many.
and 2nd is this, because i like the knot, so maybe as a bracelet. idk.
So ill try to post one of these around the 14th. Hope your having an awesome summer! I know I am :)

Monday, June 22, 2009

Natural Jewelry Holder

Ok so i was cleaning up my room and realized my jewelry was so messy and i needed to clean it up. So i took a walk down to the canyon and grabbed a branch that i had found on the ground

What is needed:
- a branch with alot of twigs
- a small jar
- pebbels
- Spray paint
-hot glue
1st- Get your branch and strip it of any leaves. NOTE: make sure branch is strong enough to hold jewelry!

1.5- Put dots of hot glue onto the branch, this will help the jewelry be separated.

2nd- Spray paint the branch to a color you desire. Im using a creme color.

3rd- Find a whole bunch of pebbels and clean them off, then spray paint them(if you want) it could also look cool if you left them as is, i could not find any pebbles, so i used sand. and it worked. I dont have a picture for this because I didnt spraypaint the sand.
4th- Glue the bottom of the branch to the bottom inside the jar.

5th- Fill up with the pebbels or sand or whatever you want to fill it up with.
6th- Make sure its stable.

WERE DONE!
I think this woul be an awesome birthday present. Or any kind of present for that matter.

Saturday, June 20, 2009

Caprisun Wallet

Here i'm going to show you how to make a wallet using recycled caprisuns. Its really easy and quick and efficient.

Your going to need:
-4 empty capri suns 0$
-an inch of velcro 1$ for a about a yard
-sewing maching (you could probably do it by hand but im sure that would be hard)
Preparation: Clean out the caprisun so that you dont get sick from bateria or mold.

1st-Set your machine on zigzag stich and sew 2 caprisuns together so its a little larger than a dollar bill. I make mine so that its 2.5 inches over lapping the other. Make 2.

2nd- Take the two pieces you have made and turn them over, you will see that there is excess caprisuns like this:
just sew that down to make it look like this:

3rd- Velcro. I like to use a straight stich on this. Set a peice of velcro so that its centered and 1 inch from the top. Sew.

On the 2nd peice, make sure to do the same, but on the OPPOSITE side. So you should have 2 peices that look like this:

4th-Set your machine so its zigzag stitch again. Put the 2 sides together (with velcro on opposite sides) and sew together leaving a place to put your cash and cards. NOTE: make sure you double back to reinforce the stiching.

AND WERE DONE!


If your too lazy to make this... you can go get it at catnip008.etsy.com